Configure Your Subscription Open the workbook, set the subscription parameter to the target subscription
Example Walk-Through
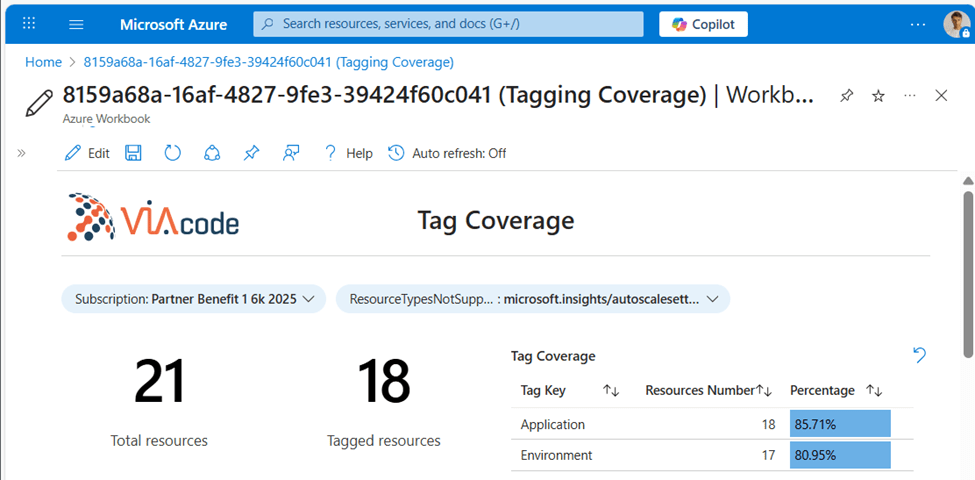
For simplicity, we’ll use two tags: Application – logical grouping by application name. Environment – e.g. Production or Development. On a subscription where no tags are applied, the workbook shows 20 untagged resources.
In “Resources without Provided Tag”, you see each resource type and exactly which resources lack either the Application or Environment tag.
Lets tag resources manually or automate with PowerShell. After, refresh the workbook—now you discover 3 resources still untagged and an overall coverage of 80 %, which you’ll want to drive to 100 %.
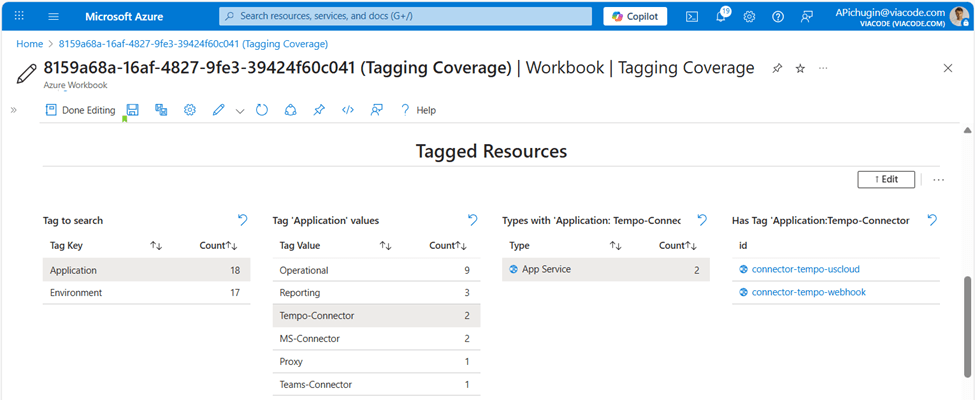
Drill back into “Resources without Provided Tag” to see that two Storage Accounts are missing the Environment tag. Correct those, and coverage hits 100 %.
Once fully tagged, the workbook becomes your launchpad—for example, you can instantly list all App Service instances where Application=Tempo-Connector.
Conclusion I use this Azure Workbook as the first stop whenever I onboard a new subscription. It saves immense time navigating sprawling resource inventories and gives managers a clear, data-driven view of tagging health from day one.
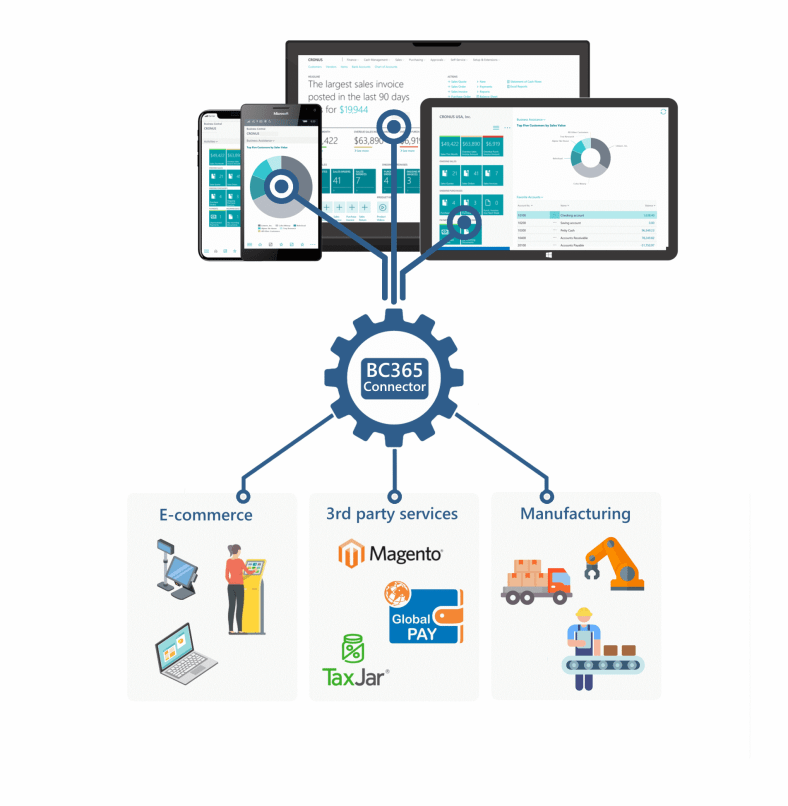
BC365 Connector is a software solution that enables seamless integration between Microsoft Dynamics 365 Business Central and third-party services. It is a powerful tool that can help businesses build a flexible and customizable ecosystem around Business Central. BC365 Connector is designed to operate with a single user license, which significantly reduces costs for multi-user access.
Examples of how BC365 Connector can be used:
Building e-commerce solutions: such as online stores, web POS, self-service kiosks, and mobile applications. In such an implementation, BC365 Connector can retrieve the list of items directly from Business Central and display them on the e-commerce website. When a user places an order, it will be automatically updated in the Business Central database. Pioneer Landscape Centersis an example of a company that has successfully implemented BC365 Connector for their e-commerce needs.
Integration with third-party services: such as payment providers, AWS, Google services, and external e-commerce solutions. By using BC365 Connector, it is possible to transfer data between Business Central and other services, making it easier to manage business operations. Grow West Cannabis is an example of a company that has integrated its product inventory with iHeart Jane platform.
Optimize complex production processes: during the production process, it may be necessary to get data from Business Central on-the-fly and send it to the device used in production. With the help of BC365 Connector, such a system can be built to significantly optimize the production process. Tokyo Shushi Label Printing is an example of a company that has successfully optimized their production process with BC365 Connector.
From a technical standpoint, BC365 Connector is a Business Central extension and server application that uses a JSON API to communicate with Business Central. This API allows BC365 Connector to send and receive data in real-time, making it an efficient and reliable solution for businesses.
For more technical information on implementing the BC365 Connector using Node.js and the AWS serverless approach, consult this article. It provides in-depth details on the implementation process and can serve as a valuable resource for developers. Additionally, if you’re interested in implementing the BC365 Connector using .NET Core, refer this article.
The Quasar Framework is a powerful open-source cross-platform framework based on Vue.js. Vue.js is trusted by numerous high-profile companies such as Alibaba, Adobe, Grammarly, GitLab, Netflix, and Xiaomi. The primary objective of this framework is to enable developers to “write code once and deploy it simultaneously as a website, a mobile application, and/or a desktop application.”
This framework offers various flavors for creating responsive web applications such as:
A SPA (Single Page Application/Website)
A SSR (Server-side Rendered App/Website)
A PWA (Progressive Web App)
A BEX (Browser Extensions)
A Mobile App (through Cordova or Capacitor)
An Electron App
Quasar Framework proves to be a useful tool for extending the functionality of Microsoft Dynamics NAV/BC. It excels at building user-friendly interfaces for interacting with NAV, making it ideal for various applications such as e-commerce solutions, self-service kiosks, POS terminals, inventory control systems, and much more. By leveraging the Quasar Framework, developers can build custom solutions that enhance NAV’s capabilities while providing an intuitive and seamless user experience.
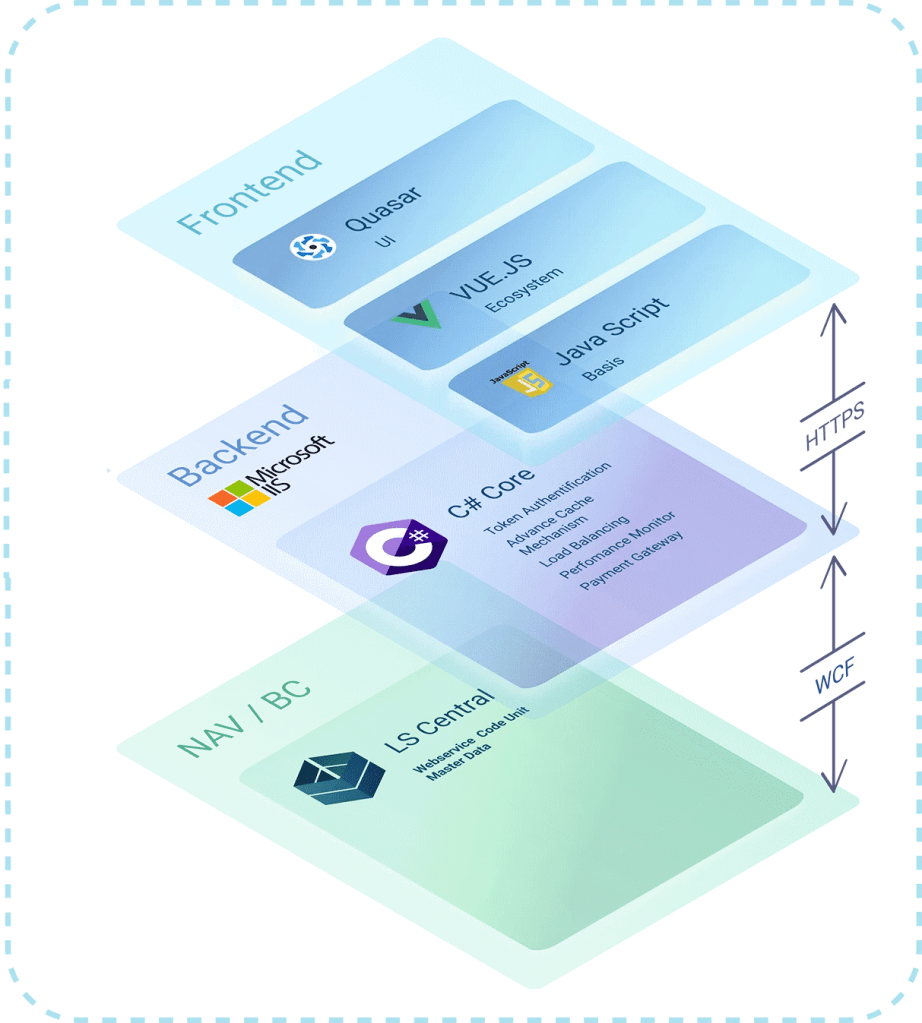
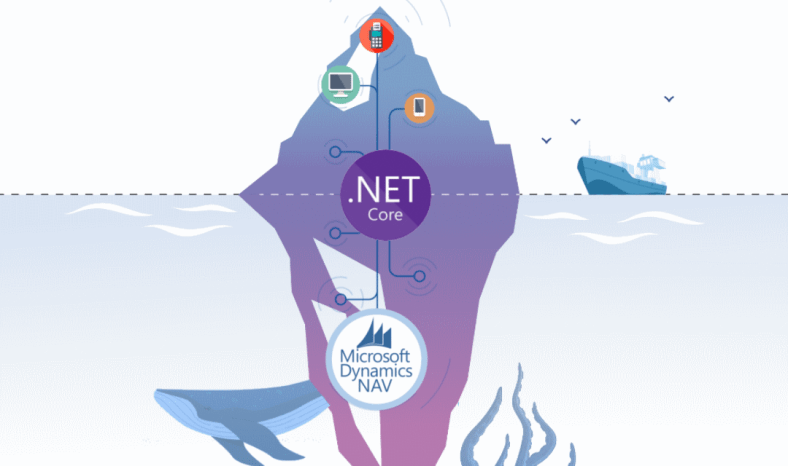
The figure above illustrates a sample architecture for integrating Quasar Framework with Dynamics NAV/Business Central. The middle tier in this architecture can be either Node.js BC365 middleware or .NET Core NAV middleware.
Examples of integration Quasar Framework with Dynamics NAV/BC.
Connecting Node.js with Dynamics 365 Business Central
In this article, I will guide you on how to transfer data between Dynamics 365 Business Central and Node.js in JSON format. The approach to creating a Node.js BC365 middleware is similar to the one in our previous article on creating a .NET Core NAV middleware. In that article, we described how to publish a codeunit with an entry point function “GetJSON” using SOAP and OData V4.
This article will focus on the following topics:
How to transfer JSON data between Node.js and BC365.
How to consume a published codeunit and build an API to manage BC365 data using Node.js.
How to leverage AWS Cloud and serverless architecture to host a Node.js application.
How to use Bitbucket and Pipelines to automate publishing and development processes.
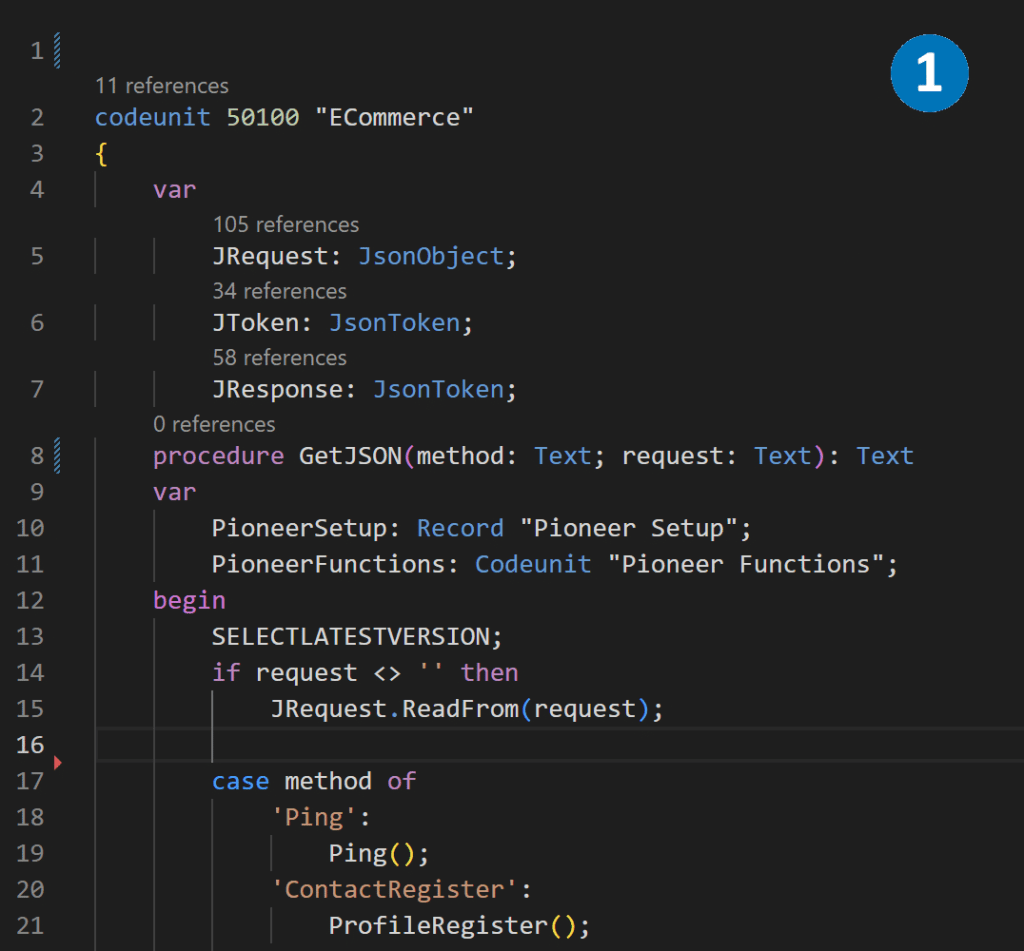
Creating GetJSON entry point function
In Dynamics 365 Business Central, it is feasible to expose a function as a web service action using OData V4. This represents a more advanced and modern approach to interacting with 365 Business Central, surpassing the SOAP Web services method.
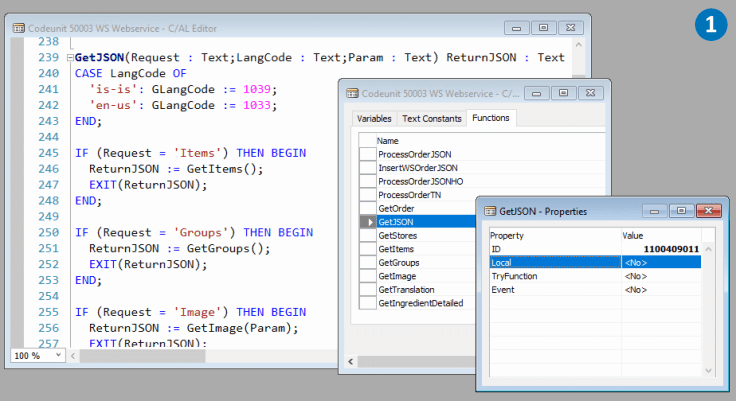
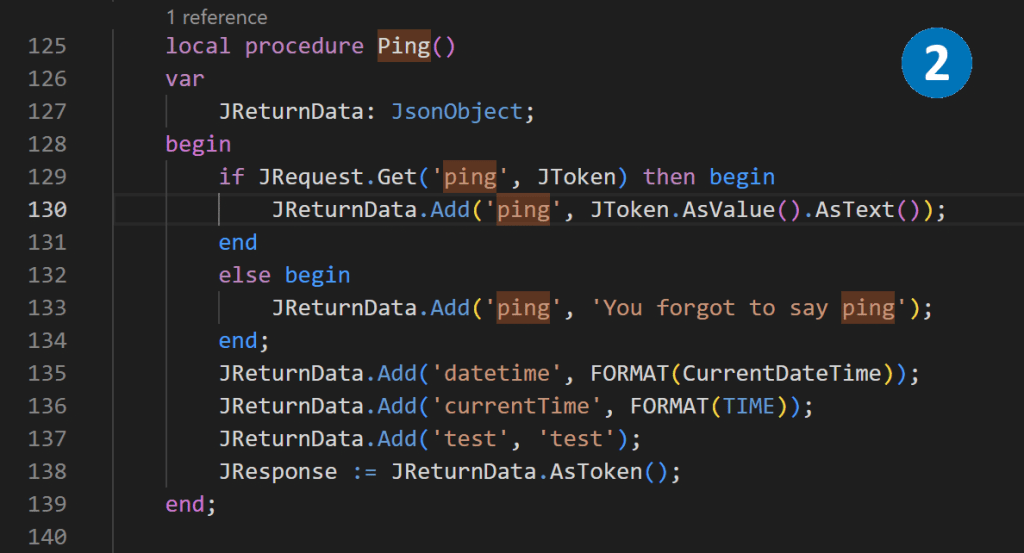
Using Visual Studio Code, we can create codeunit with GetJSON function. This function takes method and request as input parameters and returns text in JSON format. GetJSON is the central entry point, and depending on the method, it distributes data to the internal functions of the Codeunit..
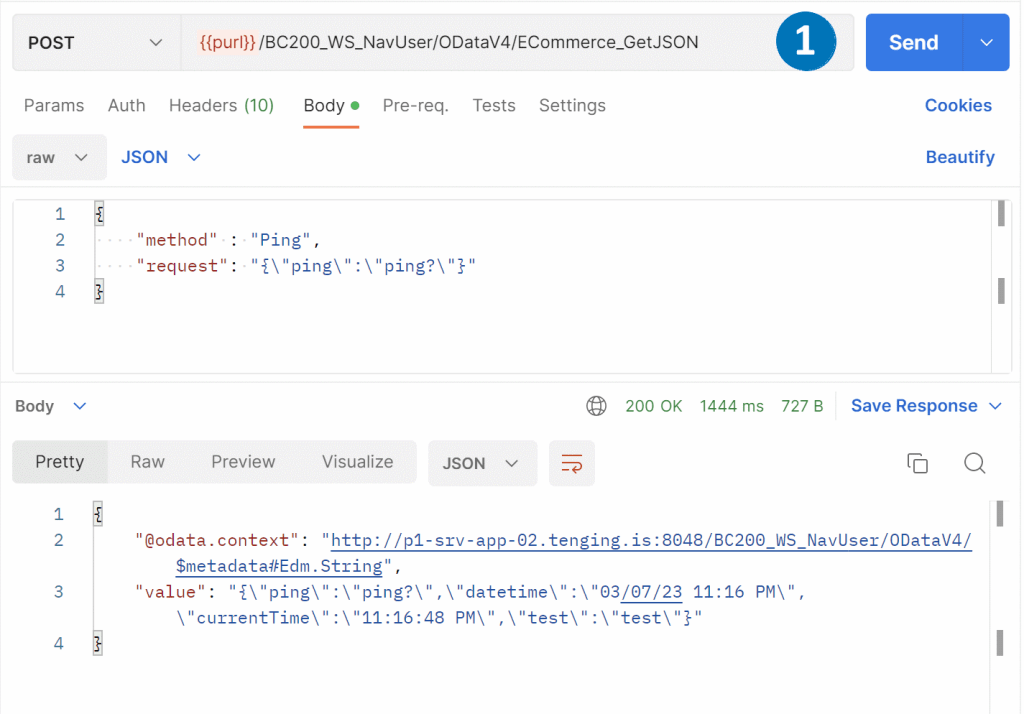
As an example, we can create a Ping function that simply sends to the output whatever it receives as an input parameter.
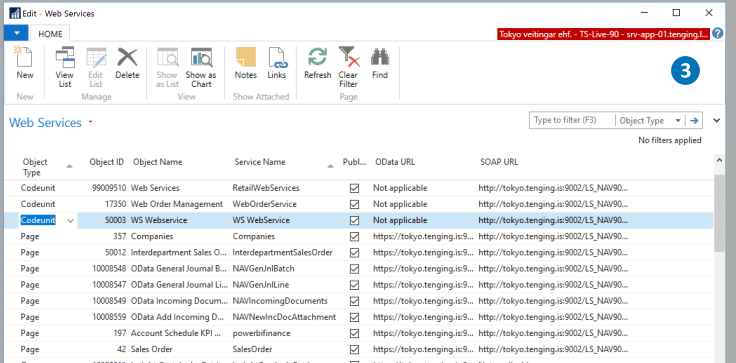
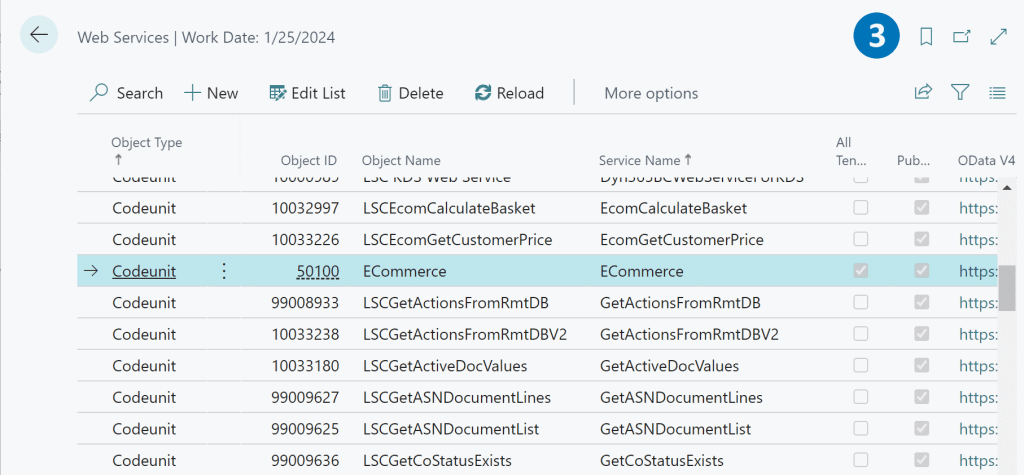
Codeunit is published as an OData V4 service.
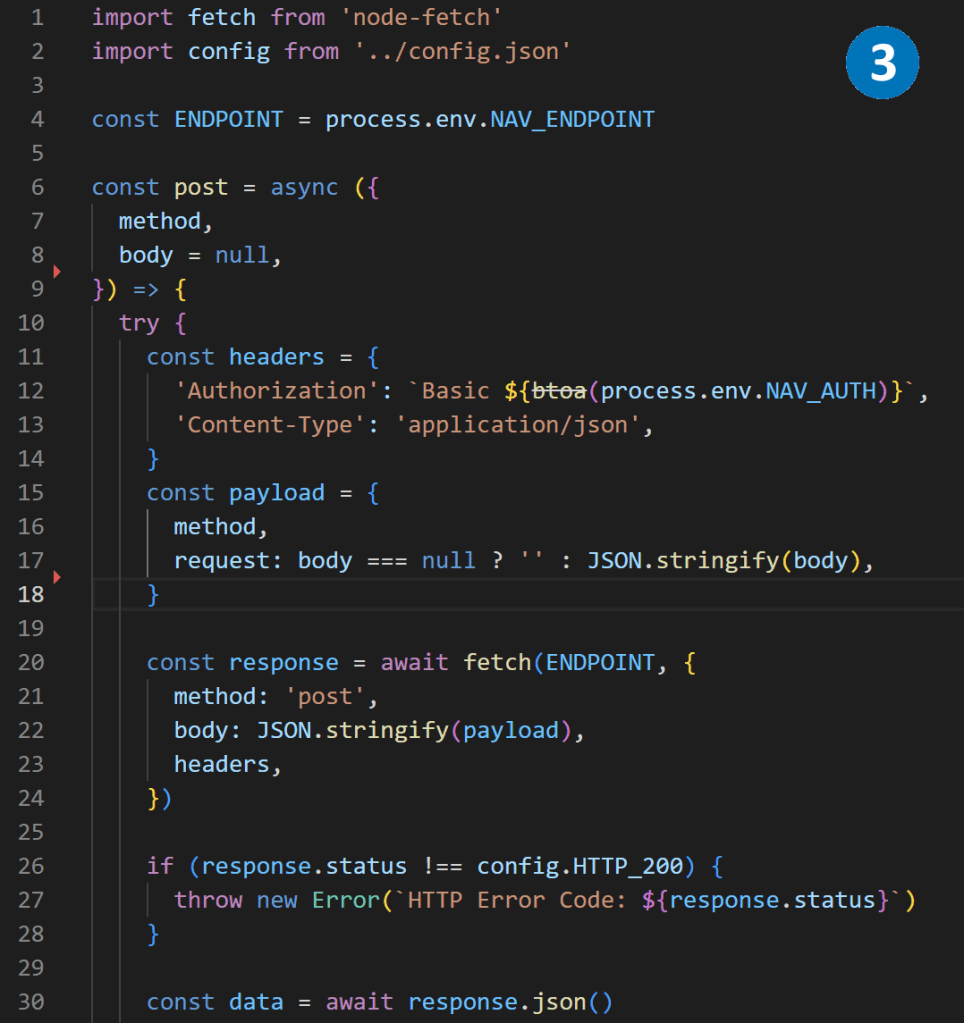
Using node-fetch library to retrive data from GetJSON function.
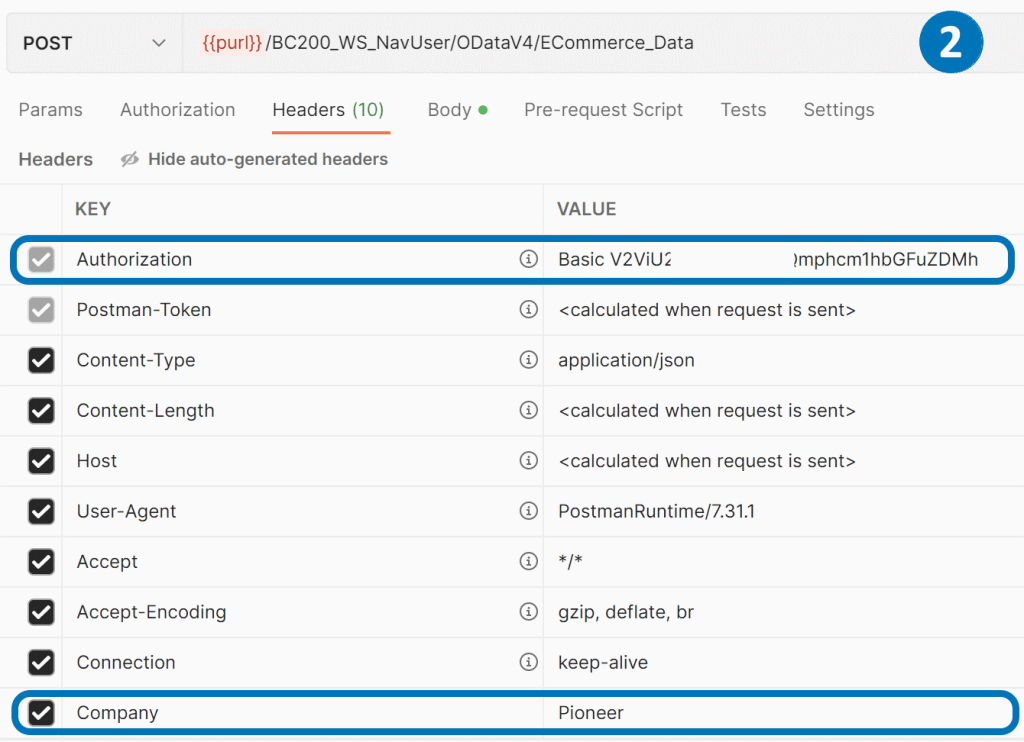
Once we’ve published the Codeunit via OData V4, we can access it using the URL https://BaseUrl/NAVMiddleTierName/ODataV4/CodeunitName_FunctionName. The JSON object we pass in the body should match the input parameters of the GetJSON procedure, which includes the method and request in text format.
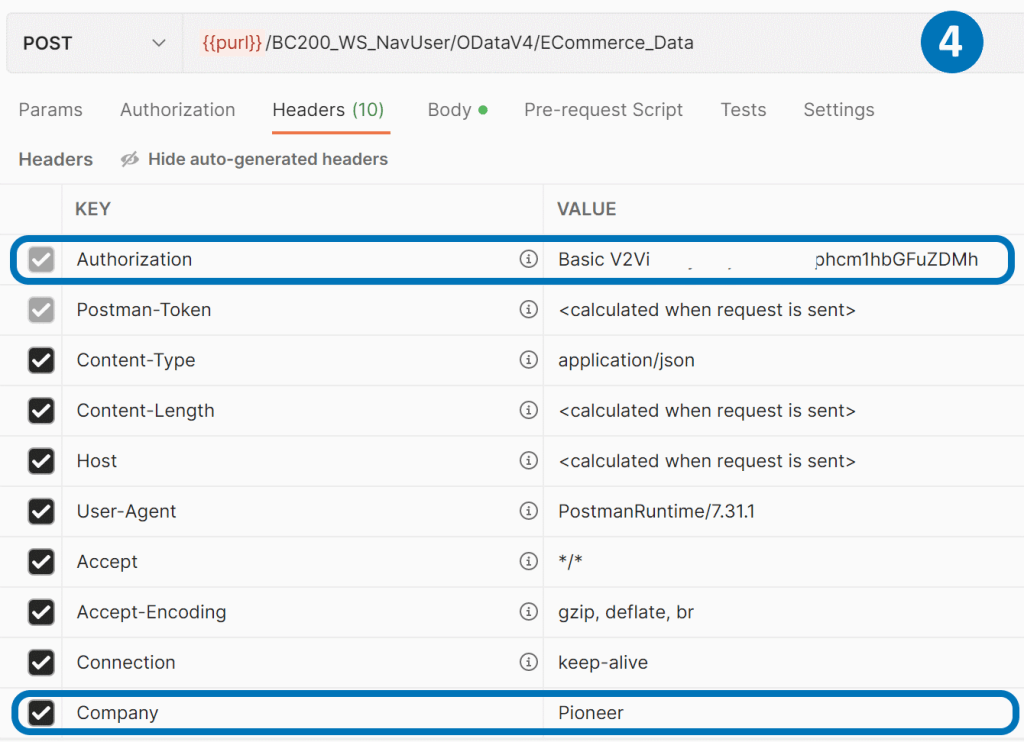
To ensure a successful POST call, we need to include special headers, such as the Authorization and Company name.
We can use the node-fetch library to retrieve the JSON data from BC365 by making a call to the URL.
Building API to manage BC365 data with node.js.
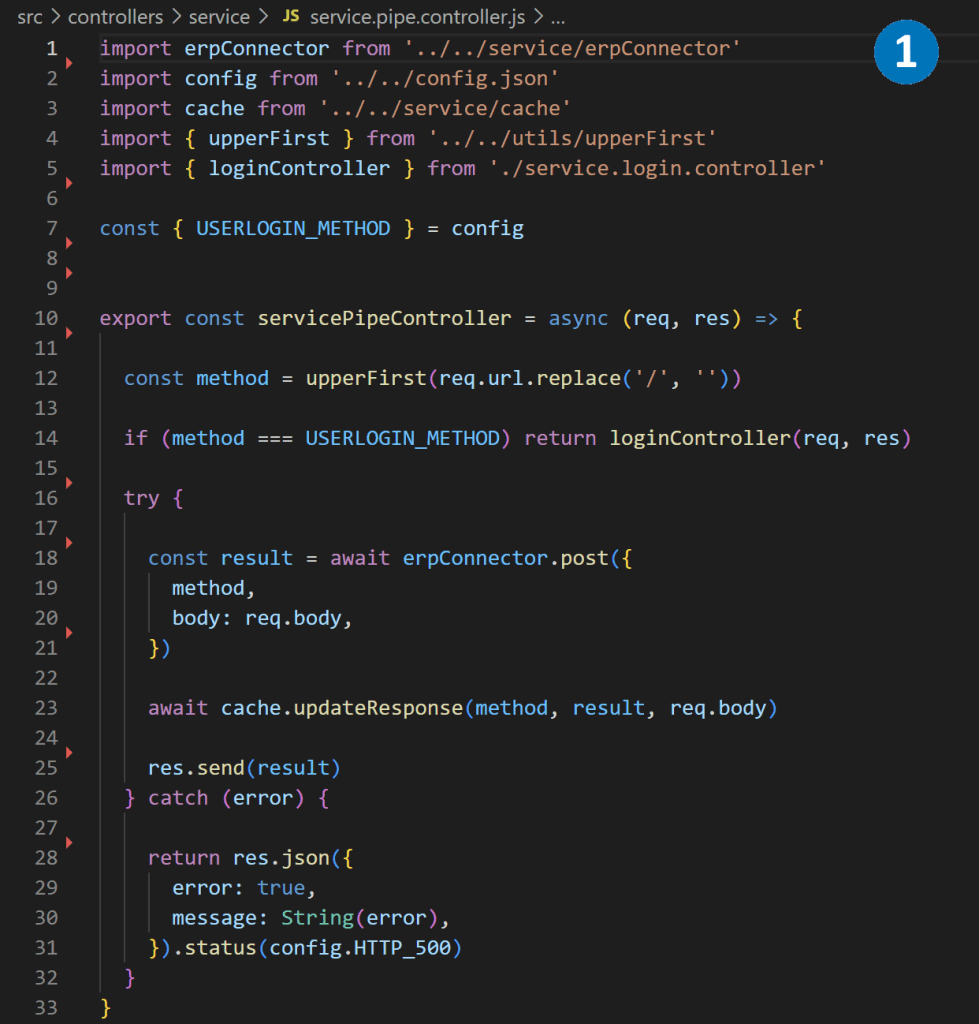
After successfully receiving BC365 data in Node.js, the next step is to build an API and expose it for implementation by other systems. One way to do this is to use the AWS cloud to host the Node.js application and a serverless model to manage it. By using serverless architecture, we can focus on writing code rather than managing infrastructure. AWS provides several services, such as AWS Lambda and API Gateway, that can be used together to create and deploy serverless APIs quickly and easily. With a serverless approach, we only pay for the resources our application consumes, and we don’t have to worry about scaling, availability, or security.
We can use the express.js library to write a controller that manages incoming HTTPS requests and passes them to the BC365 Codeunit function GetJSON. This library allows us to configure routing names, request types, error handling.
After wrapping, the API looks more friendly for consumers and requests can be called anonymously. We can even add caching, JWT authorization, and other features at this level.
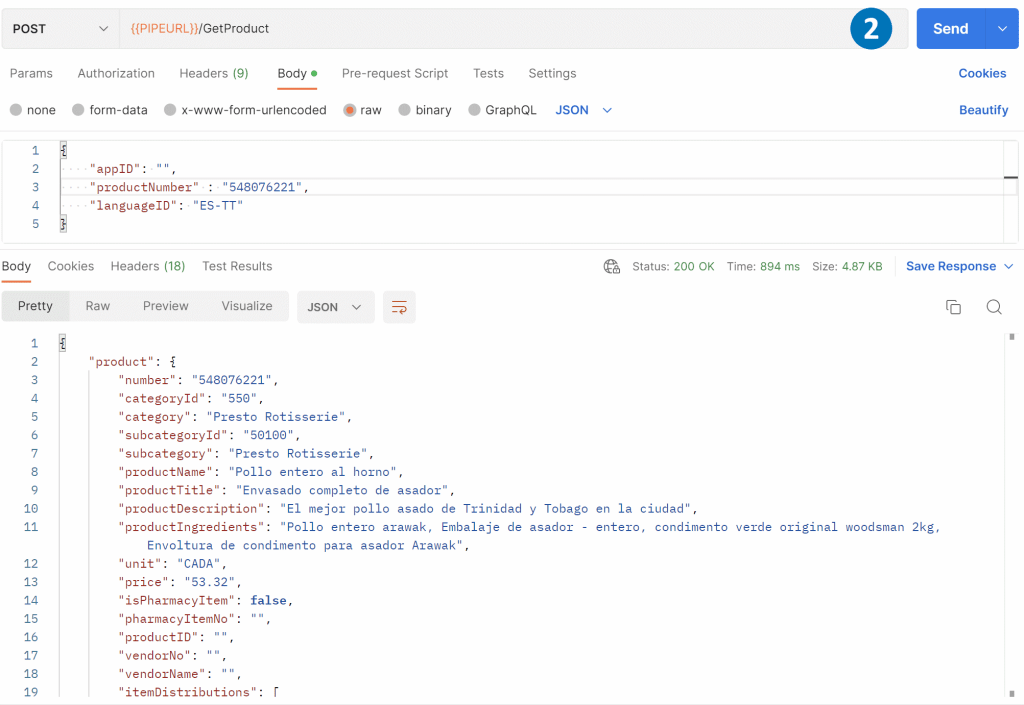
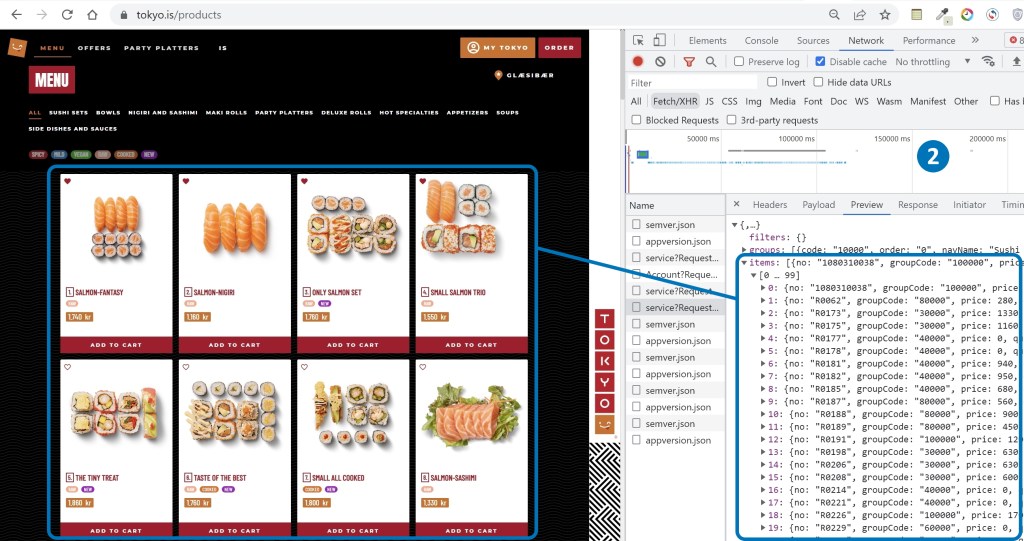
With the API wrapped, it’s ready for frontend developers to use in building web and mobile applications. For example, they can use the API to get product information and display it on a web page.
To host the node.js application on AWS, we can use a serverless. yml file to describe the application’s functions, resources, plugins, and other necessary configuration information. This prepares the application to be hosted on AWS Lambda using a serverless model.
Hosting Node.js BC365 middleware as AWS Lambda.
AWS Lambda is a serverless compute service that enables running code without the need to provision or manage servers. Serverless architecture allows for launching apps only when needed. When an event triggers the code to run, the public cloud provider dynamically allocates resources for the code. The user stops paying when the code finishes executing, leading to cost savings and greater efficiency. Additionally, serverless architecture frees developers from the routine and menial tasks associated with app scaling and server provisioning, allowing them to focus on writing code and building applications.
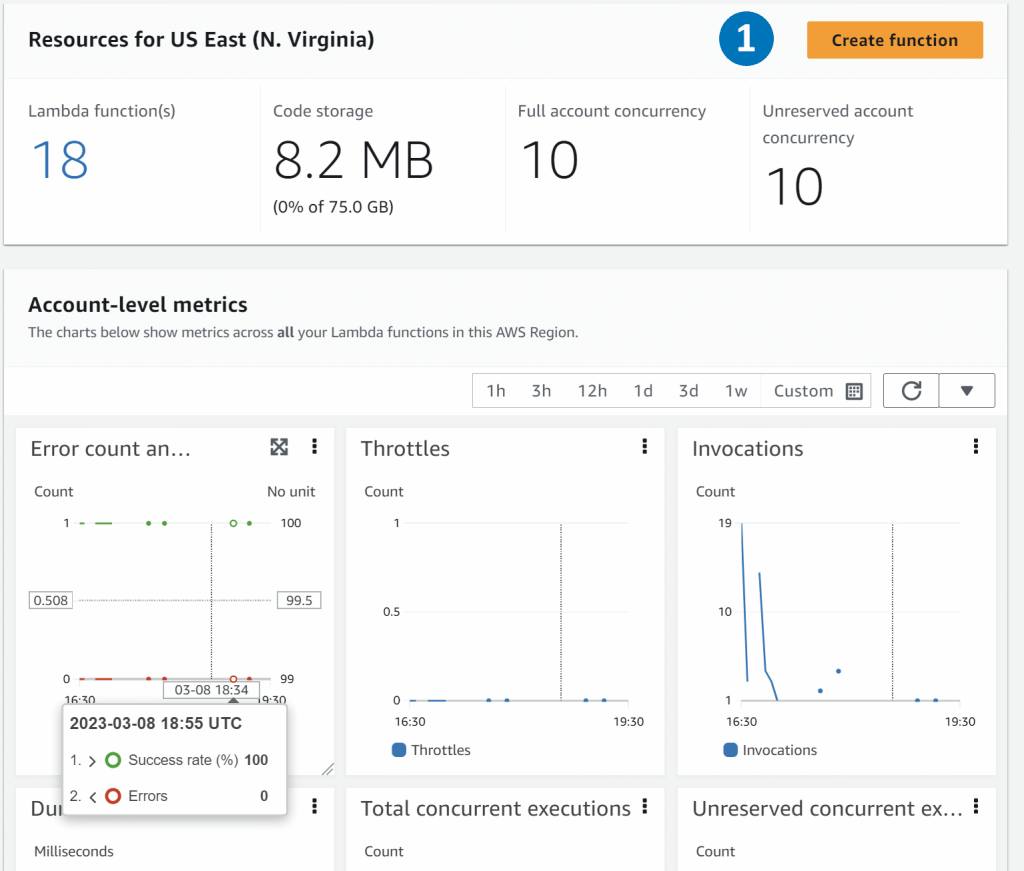
The Lambda service comes with seven metrics for your functions out of the box. Invocations, duration, error count, throttles, async delivery failures, iterator age, and concurrent executions.
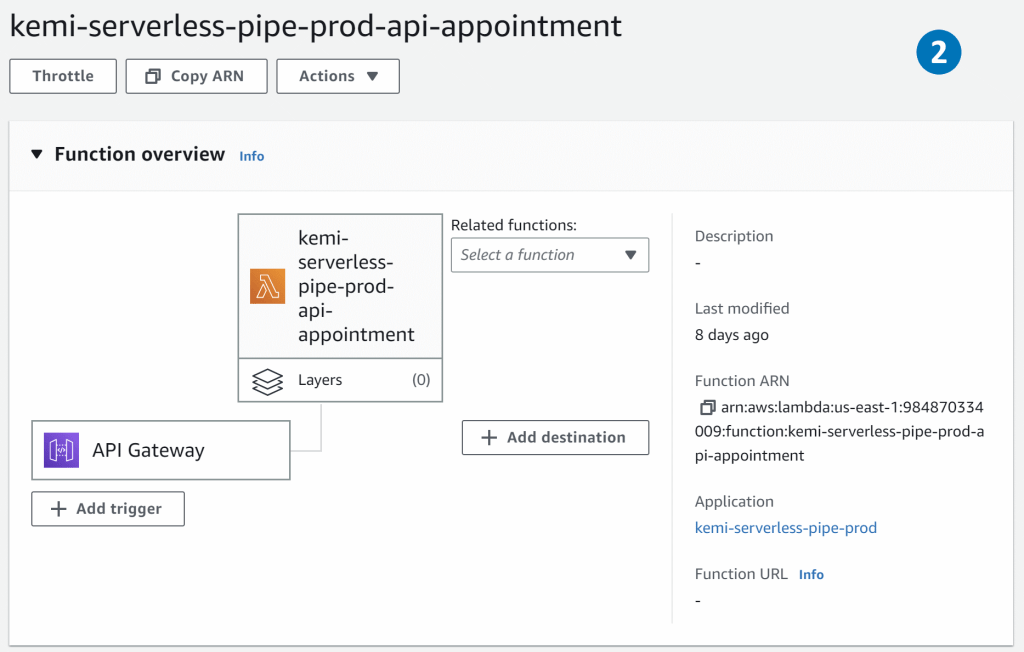
The function overview feature helps you to see triggers, layers, and destinations associated with your function. You can also view AWS services or resources that invoke the function, resources that contain libraries, custom runtime, or other dependencies.
CloudWatch Logs allows you to centralize the logs from all your systems, applications, and AWS services that you use, in a single and highly scalable service
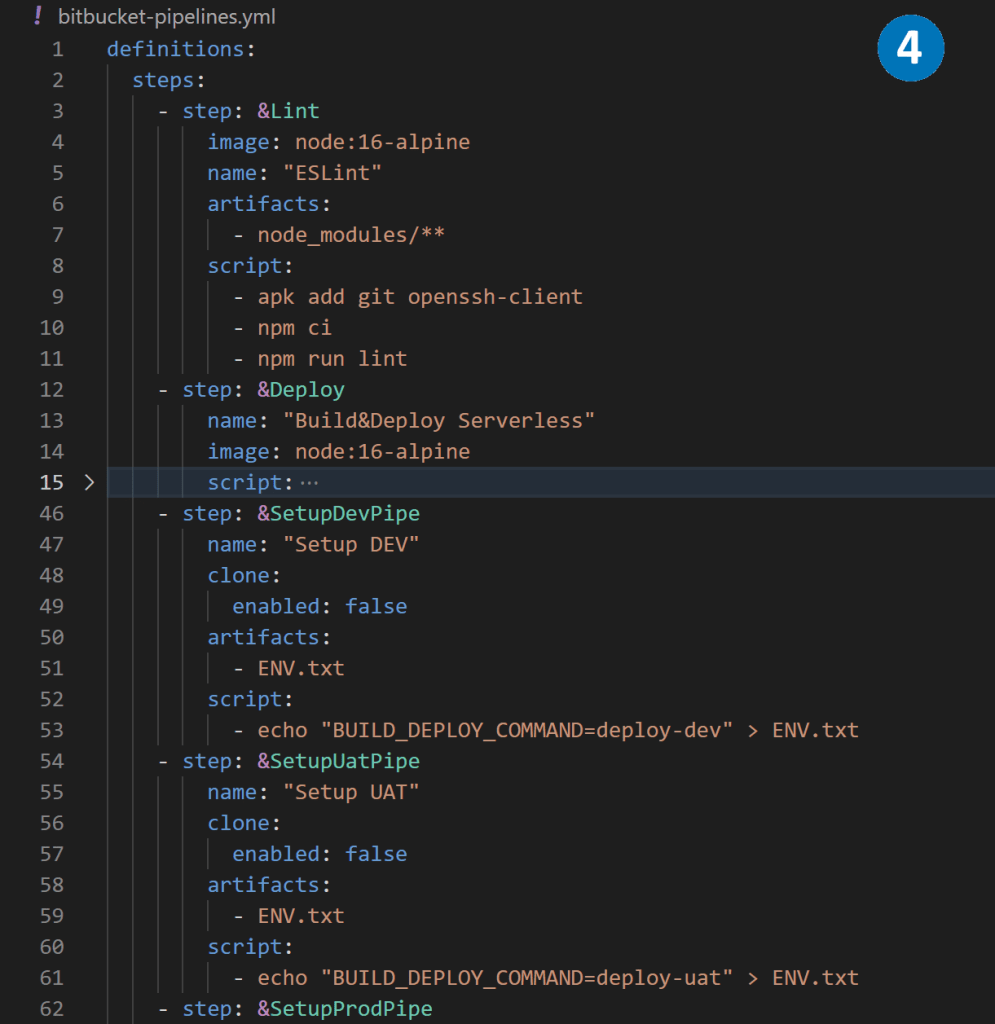
Using bitbucket pipelines to deploy Node.js BC365 middleware.
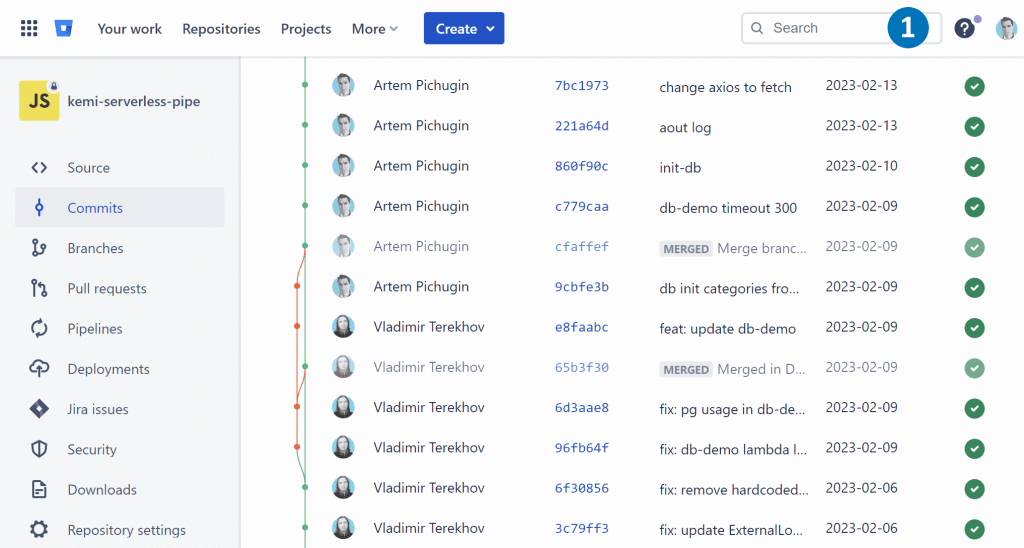
Bitbucket Pipelines is a comprehensive CI/CD service that comes integrated with Bitbucket. It allows developers to automate their build, testing, and deployment processes using a configuration file in their repository. This configuration file is called bitbucket-pipelines.yml and is usually located at the root of the repository.
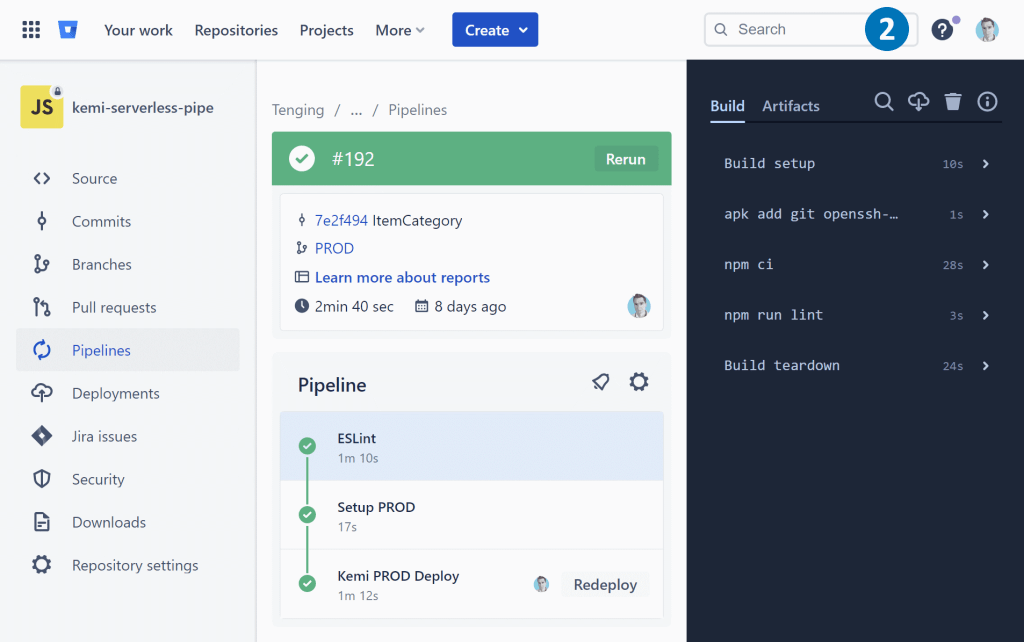
With Bitbucket Pipelines, developers can define a pipeline that consists of multiple stages, each of which can have one or more jobs. These jobs can be used to build and test the code, generate artifacts, and even deploy the code to different environments.
By setting up a Bitbucket Pipeline, developers can streamline their development workflows, ensure the code quality, and rapidly deliver their applications to production.
In this article, I will discuss different methods to transfer data between .NET Core and NAV in JSON format. We will also explore how to consume published NAV codeunit using .NET Core and build an external API to manage NAV data.
The implementation of .NET Core NAV middleware can vary based on the NAV version, authentication types, and data specifics. In this article, we will discuss three different ways of implementing the middleware.
.NET Core NAV middleware based on SOAP web services and WCF
This approach works for NAV2009-NAV2018 when codeunit is published as SOAP web service.
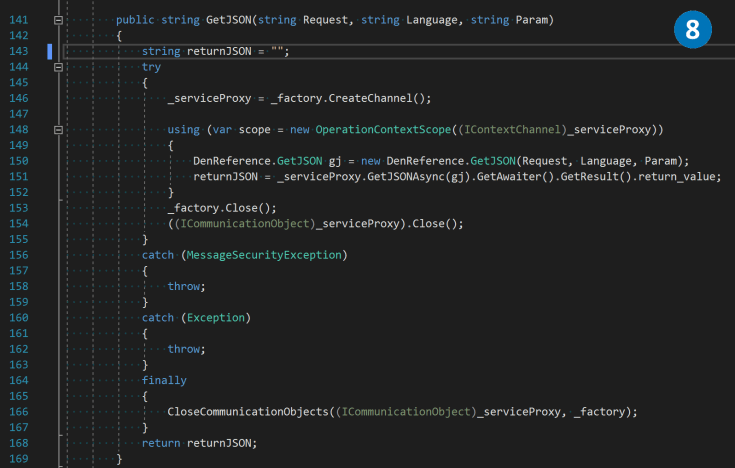
The core of our .NET Core NAV middleware is the Codeunit, which exports the external function GetJSON. This function takes Request and Param as input parameters and returns ReturnJSON in JSON format. GetJSON is the central entry point, and depending on the Request, it distributes data to the internal functions of the Codeunit.
For instance, an internal function, GetItems, returns a list of products in JSON format using the Newtonsoft.Json library as a .NET add-on.
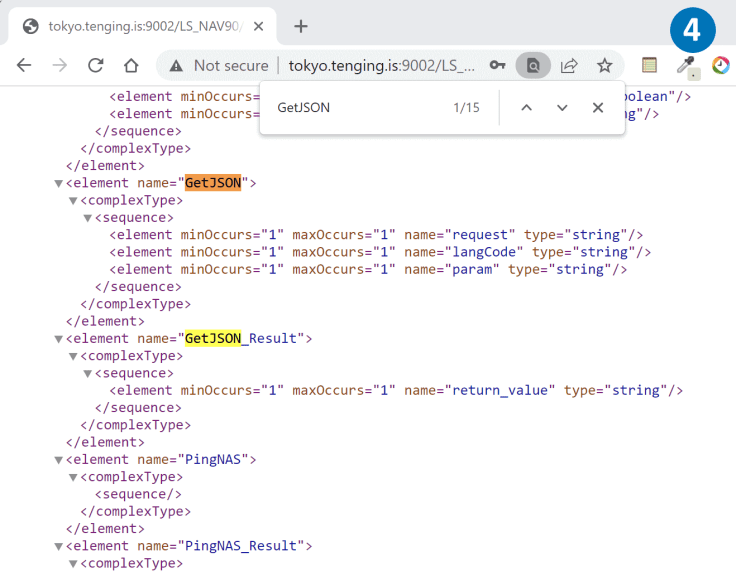
To make our Codeunit available to .NET Core, we publish it as a SOAP Web service with a specific URL.
By opening this URL in a browser, we can see the WSDL metadata of the published GetJSON function.
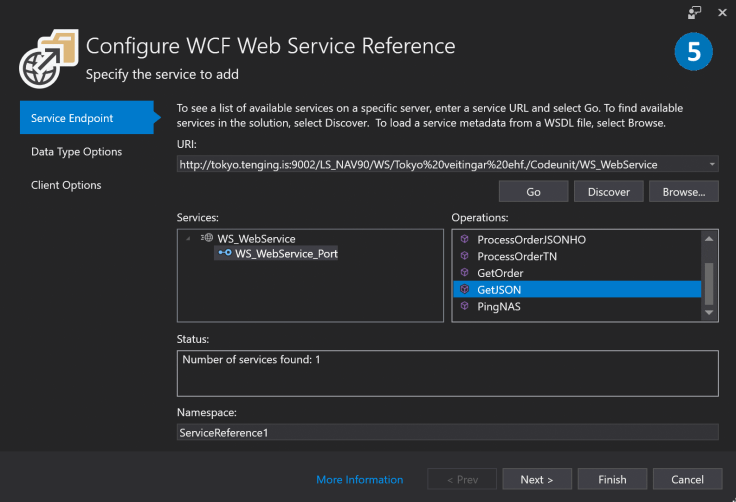
To connect the published Codeunit, we use Visual Studio tools and CoreWCF, which is a port of the service-side of Windows Communication Foundation (WCF).
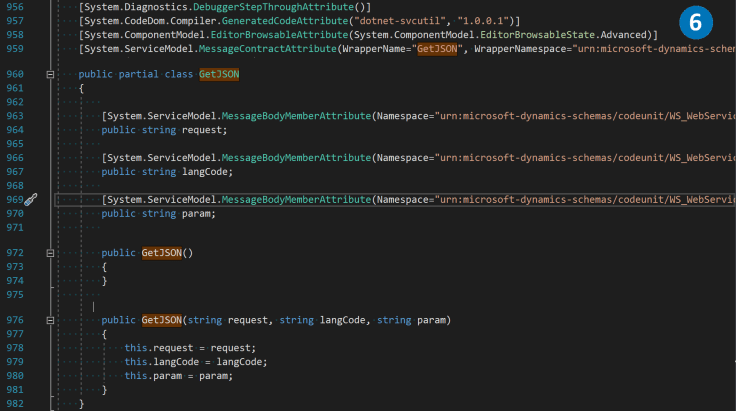
The WCF library generates all the necessary proxy classes automatically.
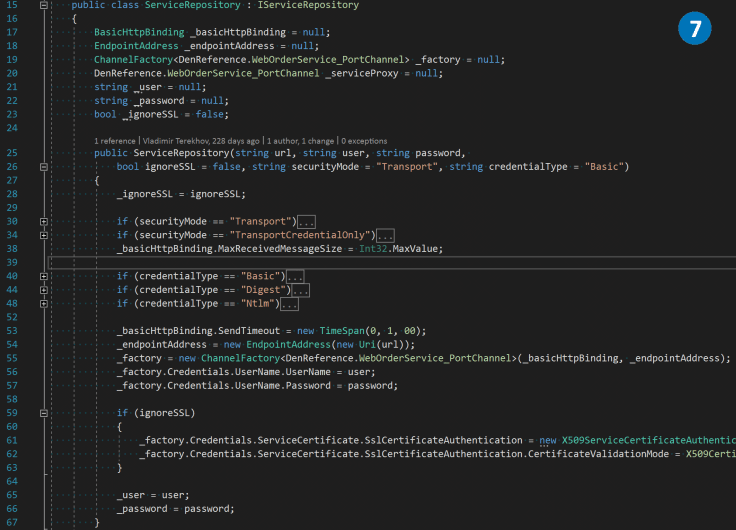
Using the generated proxy classes, we create a ServiceRepository class, which manages the connection channel.
In the ServiceRepository class, we create a wrapper over the GetJSON function to establish a connection between the NAV middle tier and the .NET Core NAV middleware.
.NET Core NAV middleware based on SOAP web services and System.Net.Http.HttpClient
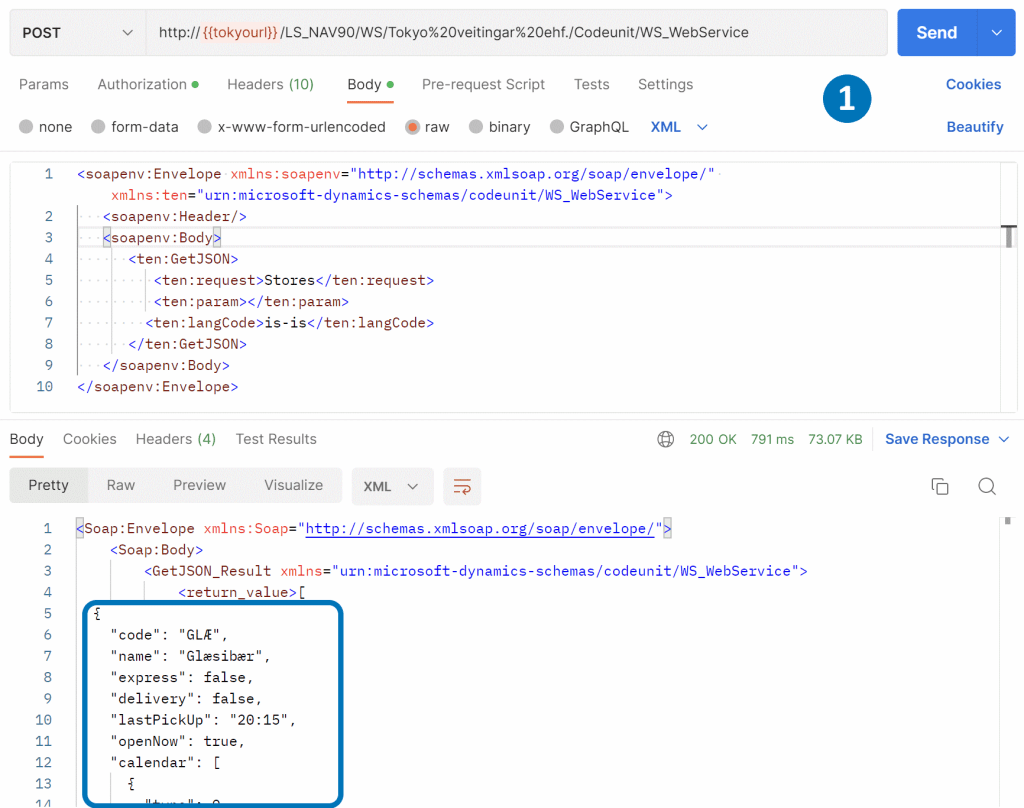
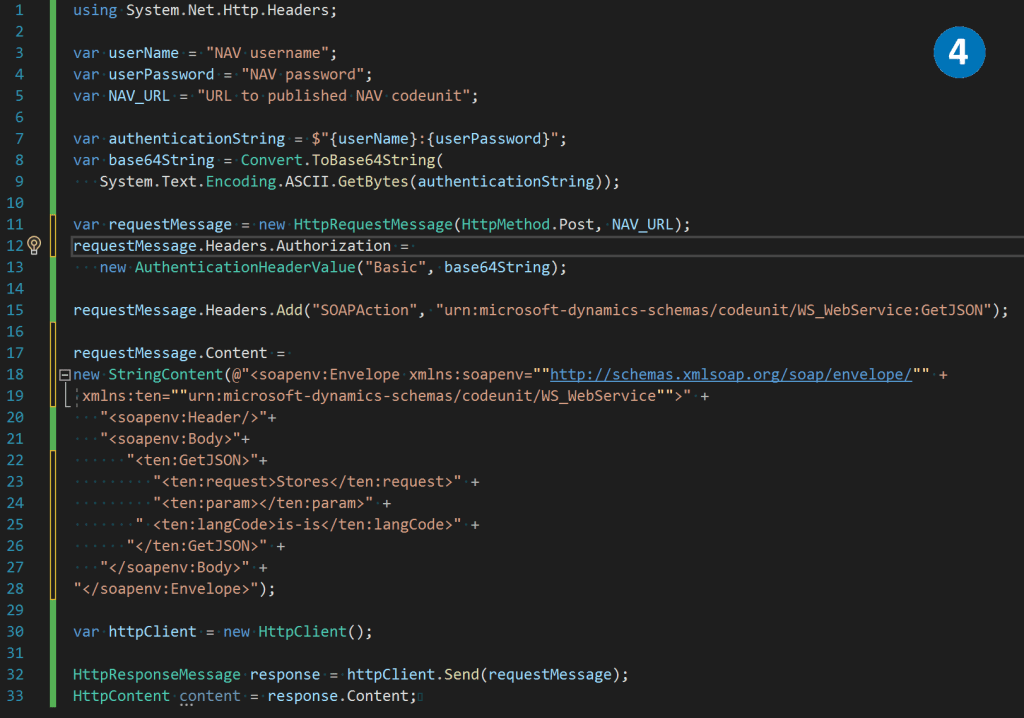
To establish a more convenient and lightweight connection with NAV in certain scenarios, one can avoid using WCF. By employing basic authorization and maintaining the GetJSON function signature, the System.Net.Http.HttpClient library can be utilized for sending simple POST or GET requests in XML format. This approach can streamline the process and offer a simpler solution for certain use cases.
To communicate with a published SOAP service, we can directly provide an XML envelope that adheres to specific rules. The JSON data from the <return_value> XML tag can be easily extracted from the request response body.
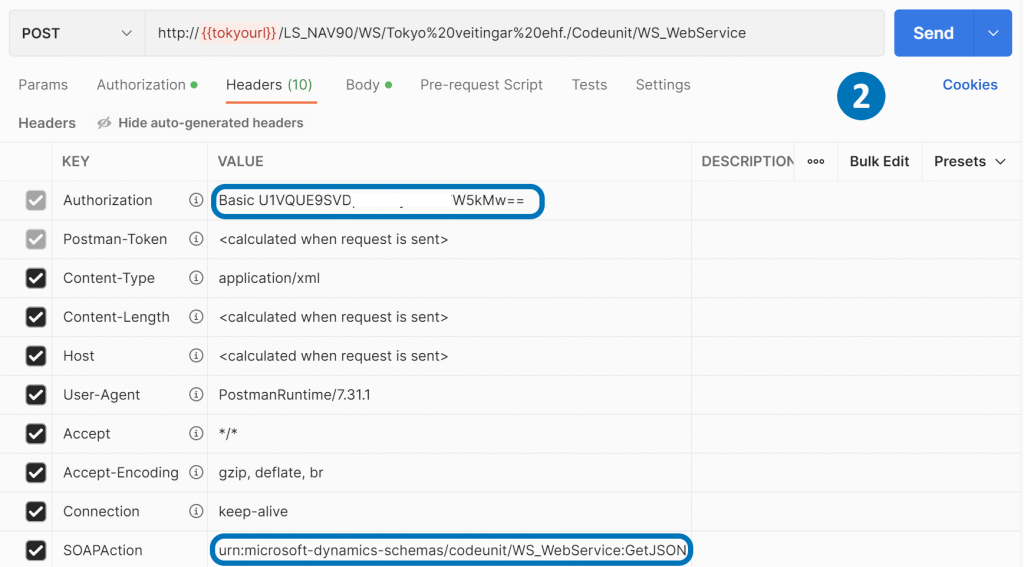
To pass authorization in the SOAP service, we need to provide the login and password encoded in a base64 string as the Authorization header. Additionally, we should include the codeunit name and function name as the SOAPAction header.
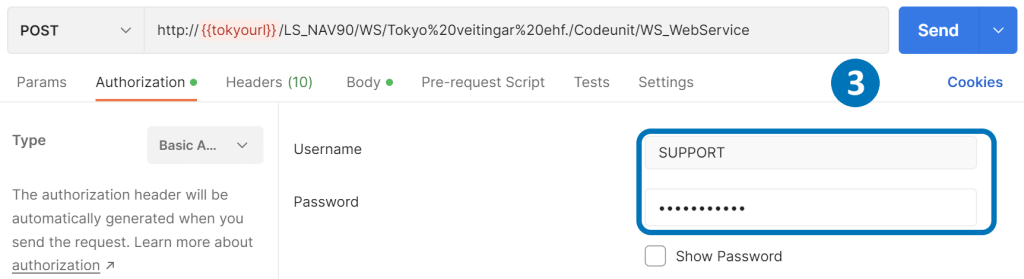
In Postman, we can enter the login and password for Basic Authorization in the Authorization tab.
Using the .NET System.Net.Http.HttpClient library, we can create a POST request, pass the necessary headers, and the XML envelope in the body to retrieve data from the SOAP service.
.NET Core NAV middleware besed on OData V4 Unbound Action and System.Net.Http.HttpClient
From Microsoft Dynamics NAV 2018 and onwards, it is feasible to expose a function as a web service action using OData V4. This represents a more advanced and modern approach to interacting with NAV, surpassing the SOAP Web services method. OData V4 is widely adopted to connect to Business Central.
In Visual Studio Code, we can create an entry point for the GetJSON function, utilizing the same approach mentioned earlier to distribute data between internal functions of the codeunit.
As an example, we can create a Ping function that simply sends to the output whatever it receives as an input parameter.
Codeunit is published as an OData V4 service.
We can call codeunit function by URL /NAVMiddleTierName/ODataV4/CodeunitName_FunctionName. However, it’s important to include basic Authorization and Company in the request headers.
By passing a JSON body to the POST request, we can receive a response from the Ping function.
With the .NET System.Net.Http.HttpClient library, we can create a POST request and include the necessary headers and JSON data in the body.
Building API to manage NAV data with .NET Core.
With the three methods outlined above, we have successfully established a connection between .NET Core and the NAV codeunit. The next step is to create an API for frontend clients such as web and mobile applications, or other systems that require NAV integration.
To accomplish this, we can utilize the ASP.NET Core MVC framework to implement the API, user interfaces, data, and control logic.
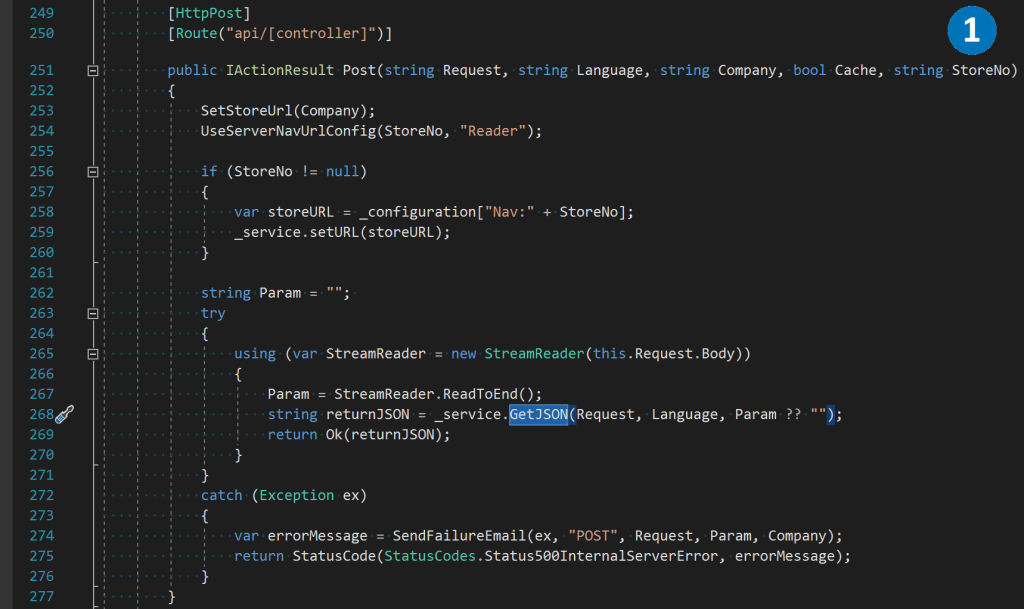
Here’s an example of an MVC controller that receives the Request parameter as a NAV method name, and a JSON string in the body. It passes this data to the GetJSON function.
Frontend applications can leverage this controller by calling the GetItems method, which enables them to retrieve a list of items directly from NAV and draw them on the screen.
Extending .NET Core NAV middleware
In this article, we have explored several methods on how to use .NET Core to extract data from NAV in JSON format and transmit it to client applications. However, the concept of .NET Core NAV middleware goes beyond being a mere data transmitter. It serves several additional purposes, such as:
Load balancing for a large number of requests
Request caching in internal memory
Intermediate storage of files and pictures
Authentication and data protection
Sending email or SMS notifications
Integration with payment systems
Logging and monitoring tools
These functionalities can be implemented as plug-ins and added to the middleware, based on the customer’s specific requirements. By leveraging the .NET Core NAV middleware, developers can create custom solutions that not only provide seamless integration with NAV but also offer additional features and functionalities to meet the client’s specific business needs.